Last updated: 1 May 2023
Is it possible to paint over the wallpaper if you don’t want to eradicate it? Is it a good idea to paint over the wallpaper? Is it even possible?
Wallpaper can be a great option for quick home renovation, but sometimes you may encounter pre-existing wallpaper that doesn’t match your style or is in poor condition.
Now that you’ve decided to give your space a new texture and color, beginning with a new paint job. However, there is a sheet or so of wallpaper that stands in your road, undoubtedly to the joy of whoever picked it, possibly several years ago. And you may be one of them. However, wallpaper fads come and go.
The Supplies You’ll Need:
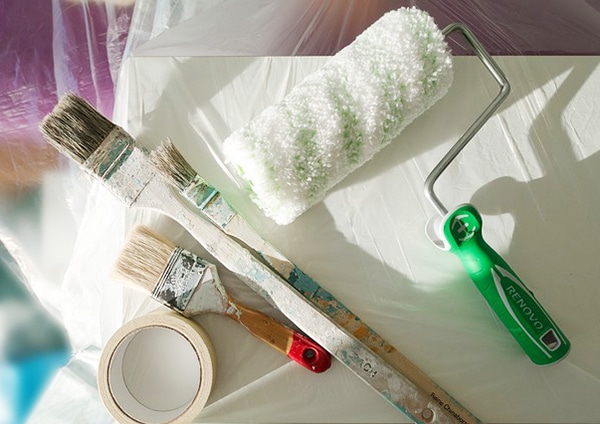
- Long-sleeve clothing
- Bucket of warm water
- Topcoat paint of your desire
- Mineral spirits
- Brushes and rollers
- Oil-based primer
- Painter’s tape
- Sandpaper
- Wallpaper seam spackle/adhesive
- Putty knife
- Soft cloths
- Trisodium Phosphate
- Respiratory mask
Steps for Painting Over Wallpaper
Step 1: Clean the Walls
Clean the debris and grime from the surfaces with a slightly wet towel. A coating of dirt will prevent the primer from adhering to it. If you have oily and filthy walls (as in a heavily utilized kitchenette), use a mild TSP mixture to wash it.
If you immerse the surfaces in the water or solutions, the glue behind the wallpaper may loosen and release, causing the wallpaper to detach or blister. Allow ample time for the wallpaper panels to dry.
Step 2: Repair the Damages on the Wall
Inspect for flaking borders or gaps since these are the locations where stickiness is the poorest. To reconnect such loosened pieces, many experts propose applying a slight coating of wallpaper seam glue.
One option is to use a small putty knife to raise such places, cutting the loosened parts and replacing it with spackle to produce a stable base, then gently sanding once totally dried. When the wallpaper includes a pattern that you wouldn’t like to show after painting, use an orbital sander or palm for sanding the entire wall until it’s flat, wash away debris with a moderately moist cloth.
Step 3: Tape off trim and molding
Thoroughly wrap the moldings, trims, wainscots, or baseboards you would like to preserve with painter’s tape.
Step 4: Priming the Walls
You should utilize the services of an oil-based primer regardless of whether your topcoat is oil-based or water-based. This isn’t a good idea since water-based priming can seep into the wallpaper while removing the glue.
That would not be accomplished with an oil-based primer. Choose a paintbrush to fill in the sidewalls, following the rollers to complete the large areas, just as you would with the paint. Give adequate time for drying, as directed by the company. Ascertain if there is adequate airflow in the area.
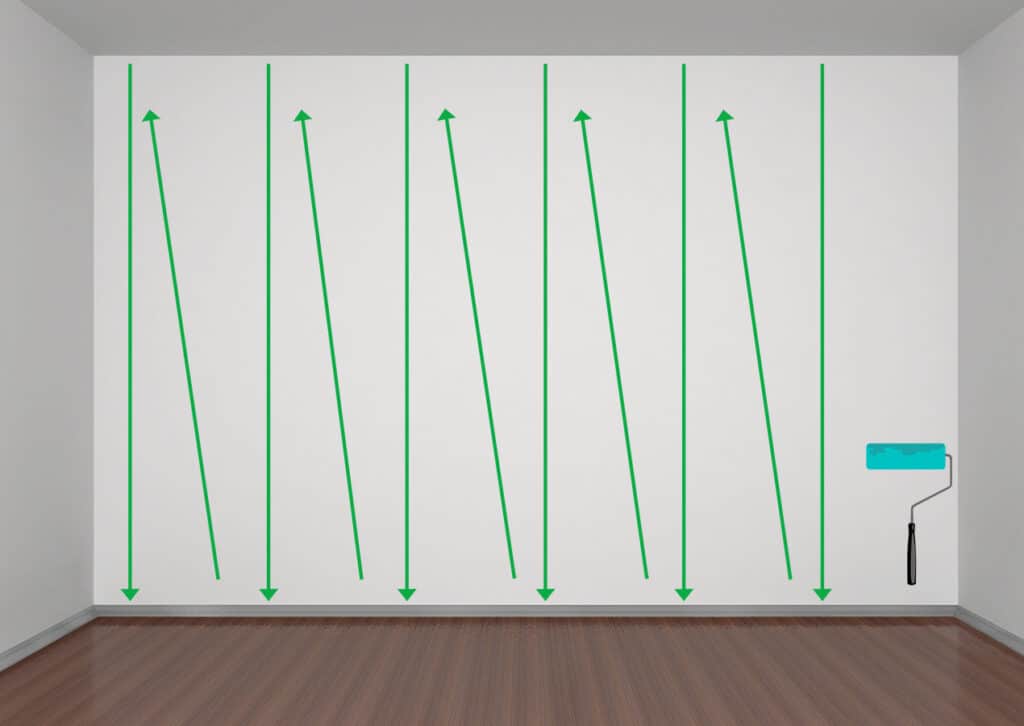
Step 5: Begin Painting
After cleaning, repairing, and priming the wallpaper and painting it like any other panel, dual coats are probably necessary, with extended drying duration somewhere between. That’s also extremely crucial when the wallpaper has a striking design or you’re painting across dark-colored wallpaper with light-colored paint.
Brushing above wallpapers is a viable option, and in some instances, it is preferable to replacing the wallpaper.
The effectiveness of the finished product, like with several house renovations, is determined by the amount of work going in at the start. To put it another way, it’s all in the planning.
Conclusion
In summary, removing wallpaper can be a daunting task, but with the right tools and techniques, it is manageable. In this post, we have explained the steps you can follow to paint over wallpaper successfully. It’s important to remember that proper preparation is key to achieving a professional-looking finish. Have you tried painting over wallpaper before? Let us know how it went and if you have any additional tips to share!


Leave a Reply